
FL Studio’s native plugins are fully capable of producing professional vocal mixes without a single third-party tool. The complete chain includes Parametric EQ 2, Fruity Compressor, Pitcher or Newtone, Maximus, Fruity Reverb 2, and the built-in Delay plugin. What separates a polished vocal from a muddy one is not the price tag on your plugins. It is the order you apply them and the discipline you bring to editing before you touch a single knob. Learning how to mix vocals in FL Studio with stock plugins is about building a repeatable, purposeful workflow.
How to mix vocals in FL Studio with stock plugins: tools and prep
Before you load a single plugin, you need the right raw material. FL Studio’s native plugins including Parametric EQ 2, Fruity Compressor, Maximus, and Pitcher allow producers to achieve professional vocal mixes without third-party tools. That means you already have everything you need sitting inside your DAW right now.
The table below breaks down each stock plugin and its role in the chain.

Plugin | Purpose |
|---|---|
Parametric EQ 2 | Subtractive and additive EQ, high-pass filtering |
Fruity Compressor | Dynamic control and gain reduction |
Pitcher / Newtone | Pitch correction and tuning |
Maximus | Multiband compression, limiting, de-essing |
Fruity Reverb 2 | Spatial depth via send tracks |
Fruity Delay 3 | Echo and stereo width via send tracks |
Recording quality sets the ceiling for everything that follows. Clean source recordings lead to mixes that require less processing and maintain natural dynamics. Vocal comping, which means selecting the best phrases from multiple takes and stitching them together, is the single most underrated step in the whole process. Edit out breaths that distract, trim dead space, and fix timing before you even open your mixer.
Pro Tip: A great comp beats plugin magic every time. Spend 30 minutes editing your vocal before you process it and you will save yourself two hours of chasing problems with EQ.
What is the correct signal chain for FL Studio vocal mixing?
Signal chain order is the most critical decision you make when mixing vocals. The correct plugin order has greater impact than specific plugin choices. Get the order wrong and your compressor fights your pitch correction, your EQ creates new problems, and the whole vocal falls apart.
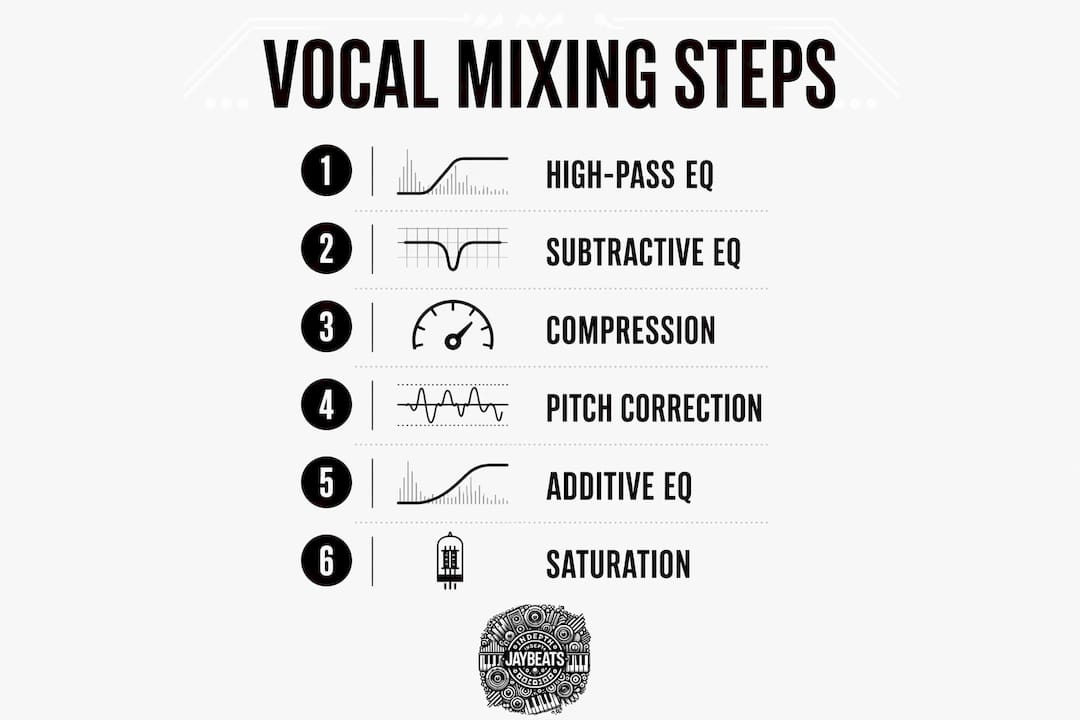
Follow these steps in order every time:
High-pass filter with Parametric EQ 2. Cut everything below 80–100Hz. Low rumble and room noise live down there. They eat headroom and muddy the mix without adding anything useful.
Subtractive EQ with Parametric EQ 2. Sweep through the midrange and cut problem frequencies. Common culprits are boxiness around 300–400Hz and nasal buildup near 800Hz. Use a narrow Q when cutting so you only remove what hurts.
Compression with Fruity Compressor. Set a 4:1 ratio with 10ms attack and a medium release around 60–80ms. Target 3–8 dB of gain reduction on peaks. That range tightens the vocal without squashing the life out of it.
Pitch correction with Pitcher or Newtone. Apply tuning after compression so the pitch tool receives a consistent, controlled signal. Compression before pitch correction ensures tuning tools work on a stable input. Use Pitcher for real-time correction or Newtone for manual note-by-note editing when the performance needs more work.
Additive EQ with Parametric EQ 2. Boost 2–3 dB in the 3–5kHz range for clarity and presence. Add a gentle shelf boost around 10kHz for air. Keep the Q wide and the moves small to avoid an unnatural tone.
Saturation with Maximus or a soft-clip effect. A subtle saturation pass adds warmth and harmonic content. Keep it light. You want the vocal to feel full, not distorted.
Reverb and delay via send tracks. Set Fruity Reverb 2 and Fruity Delay 3 to 100% wet on send channels. This keeps your dry vocal clean while giving you full control over how much space you add. Pull the send fader up slowly until the vocal breathes without drowning.
Pro Tip: Parallel processing through send tracks is the move. Never print reverb or delay directly on the vocal channel. You lose control the second you do that.
How do you handle sibilance and dynamic issues without a dedicated de-esser?
FL Studio has no dedicated native de-esser. That is a real limitation, but it is not a dead end. Maximus in multiband mode or a sidechained Parametric EQ 2 with Fruity Peak Controller can effectively tame sibilance. Set the high band threshold in Maximus to compress the 6–10kHz range and those harsh “s” sounds get controlled without killing the top end of the vocal.
Here are the key techniques for managing common vocal problems:
Custom de-esser with Maximus. Isolate the high band, set a low threshold, and use a fast attack. The compressor only fires when sibilance spikes, leaving the rest of the vocal untouched.
Sidechain EQ approach. Use Fruity Peak Controller to detect high-frequency peaks and automate a cut in Parametric EQ 2. This is more surgical but takes longer to set up.
Avoid over-taming. Pulling too much 6–10kHz makes the vocal sound dull and distant. Cut only what actually hurts on playback.
Gating and noise reduction. Use a gate or volume automation to silence gaps between phrases. Background noise that seems invisible in solo becomes obvious in the full mix.
Manual automation. Draw volume automation on loud consonants and phrases that jump out. This is old-school but it works better than any plugin for one-off problem spots.
Mixing vocals in isolation leads to over-processing. Always evaluate your effects while listening to the full instrumental. What sounds too dry in solo often sits perfectly once the beat is playing. What sounds lush in solo often sounds washed out in context.
Pro Tip: Check your de-essing decisions with the beat running at full volume. Your ears will tell you the truth faster than any meter.
How do you finalize and polish your vocal mix?
The final polish stage is where good mixes become great ones. Every decision here is about consistency and translation across different playback systems, from earbuds to car speakers to studio monitors.
Volume automation. Draw gain automation on the vocal to keep every word at a consistent level. Compression handles fast dynamics. Automation handles the slower, phrase-level inconsistencies that compression misses.
Vocal bus limiting. Add Maximus to a vocal bus channel and apply light limiting. This catches any remaining peaks and glues the vocal together before it hits the master.
Check on multiple systems. Play your mix through headphones, laptop speakers, and your phone. A vocal that disappears on earbuds needs more presence in the 2–5kHz range. A vocal that sounds harsh on laptop speakers needs a cut around 3kHz.
Subtle stereo width. Use a stereo shaper or a short pre-delay on a doubled vocal layer to add width. Keep the lead vocal centered. Width on the lead vocal creates phase issues that destroy translation on mono systems.
Vocal-to-beat balance. The vocal should sit on top of the mix, not compete with it. If the beat is masking the vocal, pull the instrumental down 1–2 dB before touching the vocal fader. You can also check out trap beat mixing practices to understand how the instrumental side of the equation affects vocal placement.
Key Takeaways
Mixing vocals in FL Studio with stock plugins produces professional results when you follow a structured signal chain and prioritize clean editing over plugin quantity.
Point | Details |
|---|---|
Stock plugins are enough | Parametric EQ 2, Fruity Compressor, Maximus, and Pitcher cover every stage of a professional vocal chain. |
Signal chain order matters most | Apply EQ, then compression, then pitch correction, then additive EQ, then saturation, then time-based effects. |
Edit before you process | Comp your takes, remove noise, and fix timing before loading a single plugin. |
Use send tracks for reverb and delay | Set Fruity Reverb 2 and Fruity Delay 3 to 100% wet on sends to keep the dry vocal clean. |
Mix in context, not solo | Always judge your vocal against the full beat to avoid over-processing and maintain natural presence. |
What I have learned mixing vocals with only FL Studio’s stock set
I have been producing since 2004 and I will tell you straight: the biggest mistake I see from newer producers is plugin hoarding. They spend $300 on a bundle and still cannot get a vocal to sit right. The problem was never the plugins. The problem was the signal chain and the edit.
When I work a vocal in FL Studio, I spend more time in the Edison editor and the playlist than I do on any mixer channel. The comp is the foundation. If the performance is inconsistent, no amount of Fruity Compressor is going to fix that. You are just compressing a mess into a tighter mess.
The thing that changed my mixes most was learning to mix for professional sound with what I already had. Parametric EQ 2 is genuinely one of the most capable EQs I have used, stock or paid. The visual feedback alone makes it easier to teach yourself frequency awareness than most hardware-style plugins that hide the curve.
My honest advice: commit to the stock set for three months. Build the chain, learn what each plugin does to the signal, and trust the process. You will come out the other side with ears that actually know what they are hearing. That skill transfers to any plugin, any DAW, any session.
— Indepthjaybeats
Production-ready beats to record and mix your vocals over
Getting your mixing workflow tight is only half the equation. The other half is starting with a beat that gives your vocal room to breathe.

At Indepthjaybeats, every instrumental is built with vocal placement in mind. The boom bap and trap beats in the catalog are mixed to leave space in the midrange where your vocal needs to live. Artists have placed music from this catalog in productions like WWE 2K25 and Love And Hip Hop Atlanta. If you want your vocal mix to translate, start with a beat that was built for it. Indepthjaybeats also offers online mixing and mastering services for independent artists who want a professional engineer to take their session across the finish line.
FAQ
Can you get professional vocals with only FL Studio stock plugins?
Yes. FL Studio’s native plugins including Parametric EQ 2, Fruity Compressor, Maximus, and Pitcher cover every stage of a professional vocal chain without third-party tools.
What order should plugins go in for FL Studio vocal mixing?
Apply high-pass EQ first, then subtractive EQ, then compression, then pitch correction, then additive EQ, then saturation, then reverb and delay on send tracks.
How do you de-ess vocals in FL Studio without a dedicated plugin?
Use Maximus in multiband mode and set the high band to compress the 6–10kHz range, or use Fruity Peak Controller to sidechain a cut in Parametric EQ 2 on sibilant frequencies.
Why should reverb and delay go on send tracks instead of the vocal channel?
Setting Fruity Reverb 2 and Fruity Delay 3 to 100% wet on send channels keeps the dry vocal clean and gives you independent control over the amount of space without washing out the signal.
How do you know when your vocal mix is done?
Play the vocal against the full beat on at least three different playback systems. When the vocal sits clearly on top without sounding harsh or disappearing, the mix is ready.