
Choosing the right audio interface is the single most important gear decision you make for capturing professional rap vocals at home. The interface is your signal chain’s foundation. It converts your mic’s analog signal into digital audio your DAW can work with, and a weak link here means muddy, noisy, or distorted takes no amount of mixing can fix. This guide breaks down how to pick the best audio interface for rap vocals by focusing on preamp quality, mic compatibility, room acoustics, and workflow features that actually matter for independent artists building a real recording setup.
What key features should you prioritize when choosing an audio interface for rap vocals?
The preamp is the most critical component inside any audio interface. A clean, low-noise preamp captures your rap vocals with clarity and dynamic punch. Noisy preamps add hiss and coloration that stack up across multiple takes and make mixing harder.
Here are the features that matter most for rap vocal recording:
Clean preamp gain. The best interfaces offer 60 dB or more of clean gain. That headroom is non-negotiable if you use a low-output dynamic mic like the Shure SM7B.
Phantom power (+48V). Condenser microphones require phantom power to operate. Any interface you buy must supply it reliably.
Low-latency direct monitoring. Hearing yourself in real time while recording keeps your delivery tight. High latency throws off timing and kills the vibe.
USB-C connectivity. USB-C is the modern standard for interface connectivity. It offers stable driver performance and broad DAW compatibility across Mac and Windows.
Input count. Solo rap vocalists rarely need more than two XLR inputs. 95% of solo vocal recording is covered by a one or two input interface, so do not pay for channels you will never use.
Pro Tip: Test your interface’s gain at maximum before buying. If you hear hiss without a mic plugged in, the preamp noise floor is too high for quiet dynamic mics.
The Focusrite Scarlett 2i2 Gen 4 sits at around $180–$199 and checks every box on this list. It includes Auto Gain and Clip Safe features that protect your takes from digital distortion. For most independent artists, it is the right starting point.
How does your microphone choice influence the best audio interface selection?
Your mic and your interface must work together. The wrong pairing wastes money on both ends. Understanding what your mic needs from a preamp is the fastest way to narrow your interface choices.
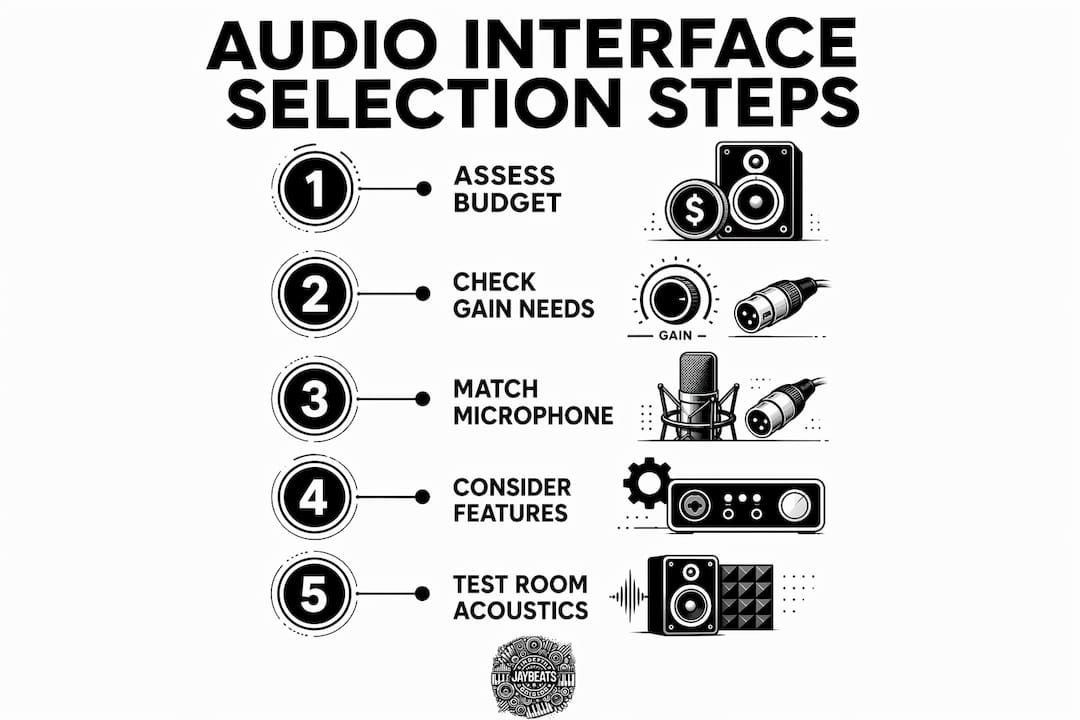
Dynamic microphones like the Shure SM7B are popular for rap vocals because they reject room noise and handle loud, aggressive delivery well. The tradeoff is output level. Low-output dynamic mics need interfaces with high clean gain or an inline preamp booster like a Cloudlifter to avoid noisy tracks. If your interface tops out at 50 dB of gain, the SM7B will push it to its limit and you will hear the noise floor.
Condenser microphones are more sensitive and output a stronger signal. They work well with most mid-range interfaces without needing extra gain. The tradeoff is that condensers pick up more room sound, so your acoustic environment matters more.
Here is how to match your mic to your interface:
High-output condenser mic: Any interface with clean preamps and phantom power works. The Focusrite Scarlett 2i2 Gen 4 handles these with no issues.
Low-output dynamic mic (SM7B, Electro-Voice RE20): You need an interface with 60 dB or more of clean gain, or you add an inline booster.
Ribbon mic: Treat like a low-output dynamic. Never engage phantom power with a ribbon mic unless the manufacturer explicitly says it is safe.
The Universal Audio Volt 276 adds another layer to this conversation. At around $250, it includes an onboard 1176-style compressor and an analog-modeled preamp circuit. That vintage compressor can add energy and presence to rap vocals during tracking. The key caution here is to monitor with effects but record dry unless you are very experienced. Printing compression to your recorded track locks in those decisions permanently. Most independent artists benefit from keeping the recorded signal clean and adding compression in the mix.
What role do room acoustics and monitoring play alongside your audio interface choice?
Room acoustics are the primary limit to your vocal recording quality. No interface upgrade fixes a bad room. Acoustic treatment has a greater impact on rap vocal clarity than jumping from a mid-range to a high-end interface. Bass traps in corners and absorption panels on parallel walls reduce the reflections and low-end buildup that make vocals sound boxy and unprofessional.
Before spending $500 on a premium interface, spend $150 on acoustic panels. The improvement will be more obvious and more immediate. A $180 interface in a treated room beats a $600 interface in a bare concrete room every single time.
Monitoring setup matters just as much as the room itself. Follow these steps to get your monitoring right:
Use closed-back headphones for tracking. Open-back headphones bleed sound into the mic. A pair of Sony MDR-7506 or Audio-Technica ATH-M50x headphones give you accurate monitoring without bleed.
Set your headphone mix before recording. Adjust the direct monitoring blend so you hear yourself clearly over the beat. Too much beat in the mix causes you to push your voice harder than necessary.
Keep monitoring volume moderate. Loud headphone mixes cause ear fatigue fast. Fatigue leads to inconsistent takes and poor performance decisions.
Check your gain staging before every session. Rap delivery is dynamic. A whispered hook and a screamed hook can differ by 20 dB or more. Set your gain for the loudest lines.
Pro Tip: Record a test take at your loudest delivery first. Set gain so those peaks hit around -6 dBFS. That headroom protects the quiet sections and prevents clipping on the hard lines.
Auto Gain features, like those on the Focusrite Scarlett 2i2 Gen 4, analyze your signal and suggest a gain setting. They are useful for quick setup but do not replace the habit of checking levels manually before every session.
What are the practical steps for setting up your audio interface to record rap vocals?
Getting your interface configured correctly from the start saves you hours of troubleshooting later. Here is a step-by-step workflow built for independent rap artists:
Connect your interface via USB-C and install the manufacturer’s driver software before plugging in your mic.
Set your DAW’s sample rate to 44.1 kHz or 48 kHz and bit depth to 24-bit. These settings give you professional audio quality without creating massive file sizes.
Plug in your mic and set input gain. Rap into the mic at your loudest delivery. Adjust gain until peaks land near -6 dBFS. Back off if the clip light flashes.
Enable direct monitoring. Turn the monitor blend knob toward “direct” so you hear yourself with near-zero latency.
Record your take clean. No compression, no EQ printed to the track. Keep the raw signal and process in the mix.
Use Clip Safe if your interface has it. The Focusrite Scarlett 2i2 Gen 4’s Clip Safe feature captures a backup recording at a lower gain level simultaneously. It rescues takes where unexpected loud lines would have clipped.
“The cleanest vocal recording comes from the simplest signal chain. Mic, interface, DAW. Add the character in the mix, not at the source.”
Common pitfalls to watch for:
Noisy vocals: Check your gain first. If gain is maxed and you still hear hiss, your mic needs a booster or a higher-gain interface.
Distorted vocals: Your gain is too high. Back it off until peaks stay below -6 dBFS.
Latency issues: Lower your DAW’s buffer size or use direct monitoring instead of software monitoring.
Compatibility errors: Always check that your interface’s driver supports your OS version before buying.
How to evaluate your budget and make a long-term investment in your audio interface
An audio interface is a long-term investment expected to last 5–10 years. Buying a solid mid-range model once is more cost-effective than cycling through budget options every two years. The math is simple: two budget interfaces at $80 each, replaced twice, costs more than one $180 Focusrite Scarlett 2i2 Gen 4 that lasts a decade.
Budget tier | What you get | Best for |
|---|---|---|
Under $100 | Basic preamps, USB-A, limited gain | Absolute beginners testing the waters |
$150–$250 | Clean preamps, USB-C, Auto Gain, Clip Safe | Independent artists recording rap vocals at home |
$300–$500 | Higher gain, better converters, analog character | Artists recording frequently with demanding mics |
$500+ | Studio-grade converters, multiple I/O | Professional studios and engineers |
Most independent rap artists land squarely in the $150–$250 range. The Focusrite Scarlett 2i2 Gen 4 and Universal Audio Volt 276 both live here and cover every real-world need for solo vocal recording. Software bundles included with these interfaces add real value too. Focusrite bundles include DAW software, plugins, and sample packs that would cost hundreds separately.
Upgrade to an external preamp or a higher-tier interface when your mic demands more gain than your current interface can deliver cleanly, or when you start recording multiple sources simultaneously. Until then, put that money into acoustic treatment and a quality microphone.
Key Takeaways
The right audio interface for rap vocals prioritizes clean preamp gain, mic compatibility, and workflow features over raw specs or brand prestige.
Point | Details |
|---|---|
Preamp gain is non-negotiable | Interfaces with 60 dB or more of clean gain handle low-output dynamic mics without added noise. |
Match your interface to your mic | Low-output dynamics like the Shure SM7B need high-gain preamps or inline boosters to record cleanly. |
Fix the room before upgrading gear | Acoustic treatment delivers more improvement than jumping from a mid-range to a premium interface. |
Record clean, process in the mix | Capture a dry signal and add compression or EQ during mixing to keep full creative control. |
Buy once, buy right | A mid-range interface in the $150–$250 range lasts 5–10 years and covers all solo rap recording needs. |
What I’ve learned after years of watching artists chase the wrong gear
Independent artists consistently spend money in the wrong order. They buy a $400 interface before they treat their room, then wonder why their vocals still sound amateur. The interface is not the problem. The room is always the problem first.
I have worked with artists who recorded on entry-level setups and placed music in major productions. The gear did not make those placements happen. Discipline, clean signal chains, and a treated recording space made them happen. The Indepthjaybeats catalog includes artists who built careers from home studios that cost less than $500 total in gear.
The other mistake I see constantly is recording with effects printed to the track. An artist hears the 1176-style compressor on the Universal Audio Volt 276 and loves the sound, so they record it into the track. Then they send the session to a mixer and the mixer has no room to work. Mix rap vocals with effects in the chain, not baked into the recording. Keep your options open.
Auto Gain is genuinely useful for quick sessions. But learning to set gain manually builds a skill that saves you in every session, on every interface, for the rest of your career. Build the habit early.
Focus on fundamentals. Clean mic. Clean preamp. Treated room. Dry recording. Everything else is secondary.
— IndepthJayBeats
Beats and production built for artists who take recording seriously
You have the knowledge to build a recording setup that captures your vocals with clarity and punch. The next step is pairing those vocals with beats that match your level.

Indepthjaybeats has been producing trap and boom bap beats since 2007, with placements in WWE 2K25 and Love And Hip Hop Atlanta. Every beat in the catalog is built for artists who take their craft seriously. Whether you need hard 808 trap production or classic boom bap energy, the library covers both. Indepthjaybeats also offers professional mixing and mastering tailored specifically for rap vocals, so your recorded takes come out sounding polished and placement-ready. Grab a free beat pack and hear the difference production quality makes.
FAQ
What is the best audio interface for rap vocals at home?
The Focusrite Scarlett 2i2 Gen 4 is the top pick for independent rap artists, priced around $180–$199 with clean preamps, Auto Gain, Clip Safe, and USB-C connectivity. It handles both condenser and dynamic microphones reliably.
Do I need phantom power on my audio interface for rap vocals?
Yes, if you use a condenser microphone. Condenser mics require +48V phantom power to operate, and any interface you buy for rap vocals should supply it. Dynamic mics like the Shure SM7B do not need phantom power.
How many inputs do I need on an audio interface for solo rap recording?
One or two inputs cover 95% of solo vocal recording needs. Paying for four or eight inputs as a solo artist adds cost without adding real-world benefit.
Should I record rap vocals with compression turned on?
Record the dry signal and add compression during mixing. Monitoring with effects while recording clean gives you the best of both worlds without locking in decisions you cannot undo.
How do I know if my audio interface has enough gain for my microphone?
Check the interface’s maximum gain spec. Low-output dynamic mics like the Shure SM7B need at least 60 dB of clean gain from the preamp. If the spec is lower, add an inline booster like a Cloudlifter or choose a higher-gain interface.
Recommended

Get 20+ Free Beats delivered to your inbox
Drop your name and email and I'll send a pack to your inbox right away.
We respect your inbox, no spam. Promise!