
Your mix sounds quiet after mixing because perceived loudness depends on mix density, headroom, frequency balance, and streaming normalization — not peak meters alone. A track can hit 0 dBFS and still sound thin on Spotify. The fix starts with a LUFS read and a headroom check, not just cranking the master fader.
TL;DR checklist:
Keep individual track peaks within a recommended range to provide enough headroom
Aim for an integrated LUFS level suitable for streaming platforms
Check for frequency masking in the kick/bass range before touching the limiter
Run a quick mono-sum to catch phase cancellation killing your low end
Table of Contents
What’s the first thing to check when your mix sounds quiet?
Run this in five minutes or less:
Check master bus peaks and LUFS. Load Youlean Loudness Meter into your master bus insert and play the full track. If your integrated LUFS reads well below -14, your mix is genuinely thin for streaming.
Solo kick and bass together. Hit mono. If the low end collapses or disappears, you have phase issues or masking — that’s stealing your perceived loudness.
Bypass all master bus plugins. If the mix suddenly sounds cleaner or louder, a plugin is clipping internally and flattening your transients.
Why peak meters lie about how loud your mix actually sounds
Peak meters show the highest instantaneous spike in your signal. Your ears don’t work that way. A single snare hit can spike to -3 dBFS while the rest of the track sits at -20 dBFS average. The meter looks healthy. The mix sounds weak.
Perceived loudness tracks average energy over time, which is what LUFS (Loudness Units Full Scale) measures. Integrated LUFS captures the average loudness across the whole track. That’s the number streaming platforms use to normalize playback. A mix with high peaks but low average energy will sound thin in a playlist because the platform normalizes it down to match louder tracks, and there’s no density underneath to hold it up.
The practical takeaway: stop mixing by peak meters alone. Watch integrated LUFS and short-term LUFS together to understand what your mix actually sounds like to a listener.
How to nail gain staging so your mix has room to breathe
Gain staging is the discipline of controlling signal levels at every point in your chain before anything hits the master bus. Get this wrong and every plugin downstream is working with a distorted or over-compressed signal before you’ve even touched a limiter.

Keep individual track peaks roughly between -18 dBFS and -6 dBFS. That range gives each plugin enough signal to work with while leaving headroom for the master bus to breathe.
Step-by-step gain-staging routine:
Start with trims. Set input gain on every channel so peaks land in that -18 to -6 dBFS window before any EQ or compression.
Set group/bus levels. Pull your drum bus, vocal bus, and instrument buses down so the master fader sits near unity (0 dB) with headroom to spare.
Check the master output. Your master bus should peak no higher than -6 dBFS before mastering. If it’s hitting 0 dBFS, you’re leaving no room for a limiter to work cleanly.
Audit every plugin in the chain. A compressor with too much makeup gain or a saturator pushing hard can clip the next plugin’s input without showing on the master.
Pro Tip: Check gain staging inside your plugin chain, not just at the master output. Internal plugin clipping destroys transient energy and makes your exported mix sound flat even when the master meter looks fine.
What streaming loudness normalization does to your mix
Streaming platforms normalize playback loudness so no single track blasts louder than another in a playlist. Spotify targets around -14 LUFS integrated, and Apple Music’s Sound Check feature adjusts playback loudness between songs — including differences between stereo and Dolby Atmos mixes.
If your master comes in louder than the platform target, it gets turned down. If it comes in quieter, it gets turned up — but if there’s no density underneath, turning it up just makes the thinness louder.
Platform | Loudness Target | Peak Ceiling |
|---|---|---|
Spotify | typical streaming loudness level | recommended true peak ceiling |
Apple Music | typical streaming loudness level | recommended true peak ceiling |
YouTube | typical streaming loudness level | recommended true peak ceiling |
| General target | a suitable loudness range | recommended true peak ceiling |
Use Youlean Loudness Meter to measure integrated LUFS before export. Pair it with a K-Meter set to K-14 during mixing to keep your levels consistent throughout the session. A 3 dB increase is clearly noticeable to the ear, so small adjustments matter more than you think.
How to use a limiter without killing your mix
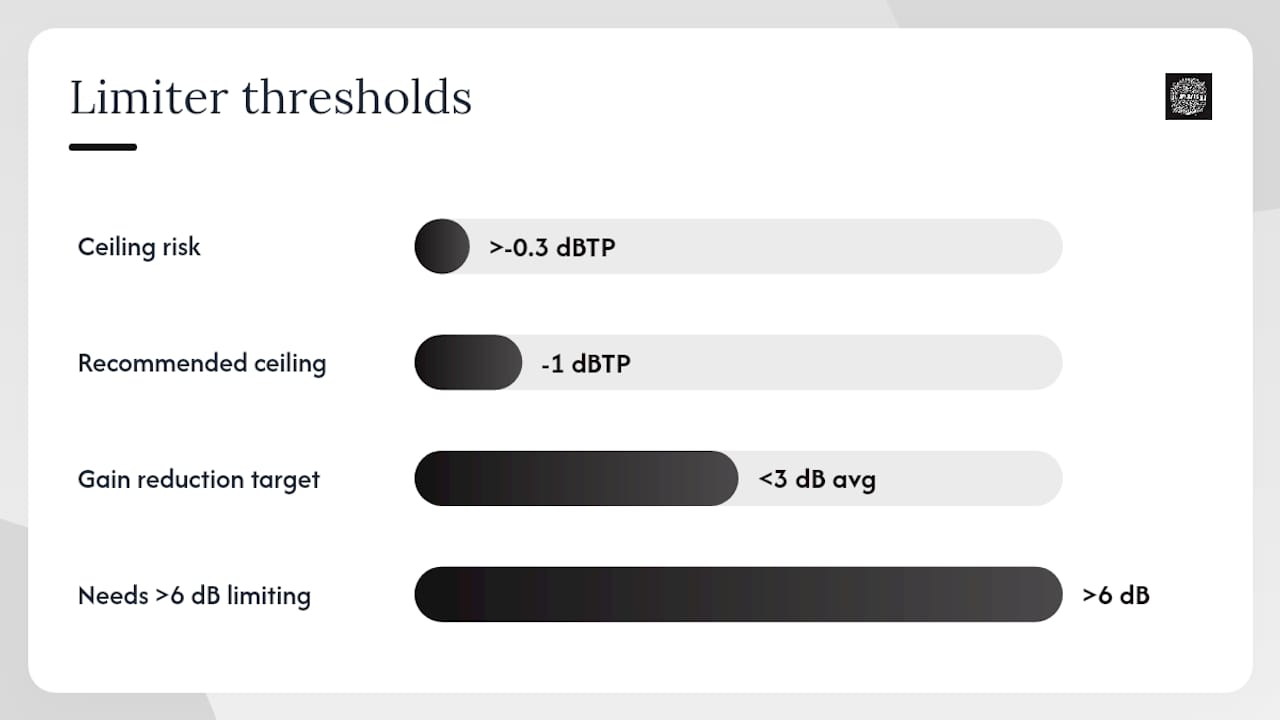
A brickwall limiter is the last tool in the chain, not the first fix for a quiet mix. Slamming a limiter on a mix that hasn’t been properly gain-staged or frequency-balanced just makes everything louder and worse simultaneously.
What kills punch:
Setting the ceiling too high (above -0.3 dBTP) risks inter-sample peaks and distortion on streaming platforms
Driving too much input gain into the limiter so it’s working constantly, not catching peaks
Using a limiter with a slow lookahead on transient-heavy material like trap drums
Limiter workflow that works:
Tame the loudest peaks earlier in the chain using clip gain or a fast transient shaper before the signal reaches the master bus.
Set your limiter ceiling to -1 dBTP (True Peak) to prevent inter-sample distortion.
Raise input gain gradually until the limiter catches peaks but gain reduction stays below 3 dB on average.
Listen for pumping or loss of punch. If the kick loses its snap, back off the input gain.
If you need more than 6 dB of limiting to hit your LUFS target, the mix needs structural work — not more limiting.
When in doubt, leave heavy limiting to mastering. A light master-bus limiter catching occasional peaks is fine. Relying on it to make a quiet mix loud is not.
Pink-noise leveling: the step-by-step method
Pink-noise leveling is a fast, accurate way to set relative track levels before you start making creative decisions. Here’s how to run it:
Tools: MDA TestTone (free pink-noise generator), K-Meter set to K-14 on your stereo bus.
Create a new audio or instrument track. Insert MDA TestTone and set it to generate pink noise.
Set the TestTone output level to -11 dB. On a K-14 meter, this should read approximately -9 RMS — your calibration reference.
Mute all tracks except the pink noise. Confirm the K-Meter reads your target reference level.
Mute the pink noise. Solo your kick drum. Raise or lower its fader until it roughly matches the level of the pink noise when you toggle between them.
Repeat for every track in the session — snare, bass, 808, vocals, pads, everything.
Once all tracks are balanced to the noise, unmute everything and play the full mix. You’ll have a surprisingly solid starting balance.
Track Type | Pink-Noise Balance Note |
|---|---|
Sub kicks / 808s | Allow slightly below reference — sub energy reads louder than it meters |
Lead vocals | Match or slightly above reference for presence |
Pads / backgrounds | 3–6 dB below reference to sit behind leads |
Master bus output | Should peak no higher than -6 dBFS after balancing |
After running the method, bypass the pink noise and make subtle fader nudges by ear. The noise gives you a starting point, not a final answer.
Export settings and quick mastering checks before you release
Export at 24-bit, 44.1 kHz minimum for any streaming release. Use dithering (TPDF dither is standard) when bouncing from 24-bit to 16-bit for CD or legacy formats. True Peak limiting at -1 dBTP prevents inter-sample distortion that standard peak meters won’t catch.
Quick mastering checklist:
Integrated LUFS: target -14 to -9 LUFS depending on genre (louder genres like trap can push toward -9)
True Peak ceiling: -1 dBTP
Stereo width: check mono compatibility one final time before export
Reference check: A/B your export against a commercial track at matched loudness
Mobile check: play the export through a phone speaker or earbuds — if the low end disappears, the mix needs more midrange presence
When to use iZotope Ozone: it’s a solid mastering suite for adding final polish, limiting, and EQ. Avoid the “Maximize Loudness” presets — they’re aggressive and will flatten your dynamics. Use Ozone’s Maximizer with conservative settings and let your mix do the heavy lifting. For mixing raw vocals over trap beats, get the vocal sitting right in the mix before mastering — no limiter fixes a buried vocal.
What to fix tonight: a prioritized action list
5–10 minutes:
Bypass all master bus plugins and check if the mix opens up
Collapse to mono and check low-end survival
Run a quick LUFS read with Youlean Loudness Meter
A/B against a commercial reference at the same monitoring volume
30 minutes:
Clean the 200–500 Hz mud zone with narrow subtractive EQ cuts
Apply parallel compression to the drum bus
Tighten kick/bass interaction with sidechain compression or careful EQ separation
When to stop and get help: If you’ve cleaned the low end, fixed gain staging, and the mix still sounds thin compared to references, it’s time to send it to a mastering engineer. Some problems are structural and need fresh ears. Check out home recording best practices if monitoring environment might be part of the issue.
Key Takeaways
Perceived loudness is built from mix density, midrange presence, and controlled dynamics — not peak meters. Fix the structure first, then limit.
Point | Details |
|---|---|
Peak meters mislead you | Watch integrated LUFS, not just peaks — streaming platforms normalize to around -14 LUFS integrated. |
Gain staging is the foundation | Keep track peaks between -18 and -6 dBFS to preserve headroom and transient punch. |
Masking kills loudness | Clean kick/bass overlap in the 60–200 Hz range before touching the master fader. |
Limit last, not first | Use a limiter ceiling of -1 dBTP and keep gain reduction below 3 dB average. |
Indepthjaybeats mixing services | Professional mixing and mastering built for hip-hop and R&B that translates on streaming. |
The real reason most indie mixes sound quiet
Most producers hear a quiet mix and reach for the master fader. That’s the wrong move nine times out of ten. The quietness you’re hearing is almost always a structural problem: frequency masking eating your low end, weak midrange presence, or gain staging that’s been off since track one. Cranking the master fader or slamming a limiter on top of those problems doesn’t fix them. It just makes them louder.
The producers who consistently get loud, punchy mixes aren’t using secret plugins. They’re building density from the ground up — clean low end, present midrange, controlled dynamics — so by the time a limiter touches the signal, it barely has to work. For trap and boom-bap specifically, the 808 and kick relationship is everything. Get those two elements sitting right in frequency and level, and the whole mix locks in. Trap beat mixing is a discipline on its own, and the low-end decisions you make there determine whether the final master sounds like a record or a demo.
Reference tracks aren’t optional. Pull up a commercial track in your genre, match monitoring levels, and listen critically. If yours sounds thin, the gap is telling you exactly what to fix. Work the mix until that gap closes, then master.
Ready to get a mix that actually hits?
Indepthjaybeats has been building placement-ready beats and mixes since 2007, with credits including WWE 2K25 and Love & Hip Hop Atlanta. If your mix is still falling short after running through these fixes, the fastest path to a streaming-ready record is a professional set of ears on it.
The online mixing and mastering service is built specifically for rappers and independent artists who need their records to translate on Spotify, Apple Music, and everywhere else. Proper gain staging, low-end clarity, and LUFS-targeted masters are standard — not an upsell. If you’re starting from scratch, grab beats from the catalog and come back when you’re ready to take the record to the next level.
Tools and sources to go deeper
Music Mixing Fundamentals: Levels, Panning, and Balance | Music Production Authority
How to set mixing levels and get a balanced mix | Antares Tech blog
Why does my music sound quiet? Fix weak mixes & masters instantly. | Soundplate
Sound Check: Apple support
Mixing to a pink-noise reference | Sound On Sound
Mastering audio balance: essential tips for mixing sound levels | SoundCy
Why Is My Song So Quiet — What Actually Causes It and How to Fix It | AREFYEV Studio
Recommended

Get 20+ Free Beats delivered to your inbox
Drop your name and email and I'll send a pack to your inbox right away.
We respect your inbox, no spam. Promise!